User Tools

Site Tools


lookup_relation

Lookup Relation

Note: Available only in Regular edition

Lookup Relation is the process of creating relationships that can be used to store values from other object's data. It provides a convenient way to pass data around in an application. This page  lets you quickly create, and view details. In addition, this page lets you copy, delete, and edit details.

You can click Configure ? Lookup Relations menu item. The "Data Binding" page opens. This will list the Bind Id, Name, Object, Storage Field, Links to Edit, Copy and Delete.

Creating a new lookup relation/data bind

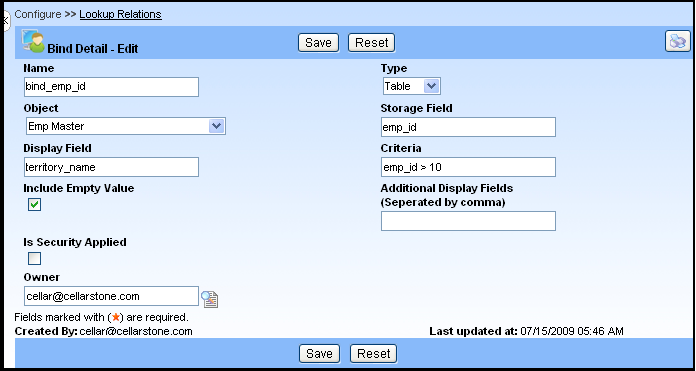
 The user can create a new data bind or relational field by defining the Bind Id, Bind Name and other details. You have to follow the steps given below to add new data bind "bind_emp_id" for the object "Emp Master".

  1. Click Configure ? Lookup Relations menu item. The "Data Binding" page opens.

  1. Click on Add New button to create a new data bind for the object. The "Bind Detail - Add" page opens.

  1. Type the name for the data bind in the Name text box. For example, type the name as "bind_emp_id" in the text box.
  2. Select the type of object (either Object or Table) from the drop-down of Type. For example, select the type as "Table".
  3. Select the table from the Object text box. This will map the object specified and fetch the value. For example, type the Object as "Emp Master".
  4. Type the field name in the Storage Field text box. The field name in the Storage Field is used to fetch and store the value. For example, type "emp_id" in the Storage Field text box.
  5. Type the field name in the Display Field text box. This field name is used for display purpose, to provide values that are more meaningful to user when Storage Field does not provide any clear view. For example, type "territory_name" in the Display Field text box.
  6. Type the condition in the Criteria text box. For example, type the condition as "emp_id >10", to display only the names of employee id greater than "10" in the drop down Display Field.
  7. Select the Include Empty Value check box to allow the empty value in the drop down.
  8. Type the required fields separated by the commas in the Additional Display Fields text box. The fields specified in this text box will be shown in new window that shows on clicking the lookup icon.
  9. Select the Is security applied check box whether this value can access or restricted to the users based on the security condition.
  10. Select the Owner of the record. Typically Owner will be any of the user id. E.g.sample_randy@cellarstone.com. By default, Owner will have access to this record.
  11. Click Save to save the data binding details.

Note:

  • To update a data bind details, click Edit  icon, and then change the fields you want to update.
  • To copy the data bind details from an existing data, click Copy   icon.
  • To delete a data bind detail, click Delete  icon provided on the list page.
  • To view the particular data bind detail, click on the required Bind ID link.
  • To sort the column alphabetically/ascending order, click on the required column header and click the column heading a second time, to reverse the sort order.

  • Click to go top

    lookup_relation.txt · Last modified: 2020/07/16 22:55 (external edit)