User Tools

Site Tools


workflow_designer

Workflow Designer

Workflow is the automation of a business process, during which data are passed as work items from one user to another according to a set of rules defined in the workflow. Workflow can be created using Manage Workflow option and can be viewed using Workflow History option.

This page creates and maintains the workflow Ruleset. Administrator can enter the rule set details manually in this page. The Manage Workflow menu  lets you quickly create and view details. In addition, this menu lets you to edit, delete and copy details.

You can click Configure ? Manage Workflow menu item to display the "Manage Workflow" page. This page will list all the Name, Description, Links to Edit, Delete, Copy option. From this page, you can view detailed workflow rules and access other related information.


Definition of Workflow terminology

Workflow Ruleset: Defines the type of workflow such as User based or Title based and Object that should trigger the workflow.

Ruleset Trigger: Defines the initiation criteria to trigger the workflow.

Event: An instance that occurs on an object to trigger the workflow

Criteria: Defines the Condition that triggers the Workflow

Workflow Rule: Rules that defines the flow of tasks from one user to another and the action to be done on every approval or reject

Workflow Item: Work to be processed by the user

Workflow Ruleset is the rule defining the event, and criteria to trigger the workflow for the users. Two different types of workflow can be set - User Based, and Title Based.

User Based Workflow - To define a Workflow based on the users

Title Based Workflow - To define a Workflow based on Title maintained in Organisation Structure.

Workflow Item is the representation of the work to be processed. The Workflow Item can either be approved or rejected by the workflow user.

Workflow Status: Draft, In Workflow, Rejected and Approved


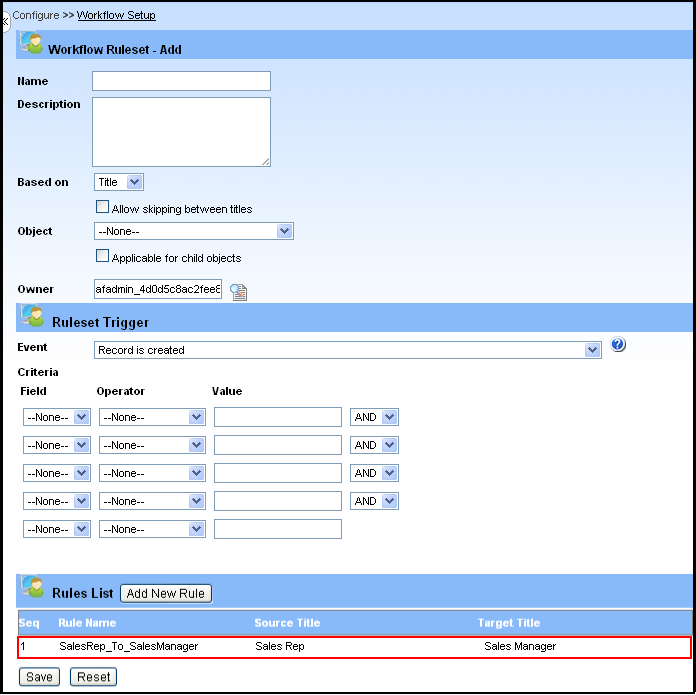
Creating a New Workflow Ruleset

Admin user can create a new Workflow Ruleset and its description.  You have to follow the steps given below to add new menu "Emp Master" under the Menu "Samples" using the pageset" Emp Master".

  1. Click Configure ? Manage Workflow menu item. The "Manage Workflow" page displays.

  1. Click on Add New button to create a new ruleset. The "Workflow Ruleset" page displays.

  1. Type the name of the ruleset in the Name text box. For example, type the name as "SalesRep_To_SalesManager".
  2. Type the description about the ruleset in the Description text area. For example, type the description as" Workflow from SalesRep To SalesManager".
  3. Select either the option "Title" to create a title based workflow or "User" to create a user-based workflow from the Based On drop-down. Here, selected option is "Title".
  4. If you wish to skip between the titles of the users, then select the Allow skipping between titles check box. For example, it helps the user to submit directly the Workitem to the higher authority who is not the immediate reporting to user as per the organisation's structure.
  5. Select the table from the Object drop-down for which the workflow is to be applied. For example, select the object as "Emp Master".
  6. If workflow needs to be initiated based on any change in the child object also, then select the Applicable for child objects check box.
  7. Select the field check boxes for the selected object in the Workflow Alert Expanded Fields list area. The fields which are selected will be displayed in each row of the workitem message in the "Workflow Item" page. For example, select the Employee ID check box to display in each row of the workitem message in the "Workflow Item" page.
  8. In the Ruleset Trigger section, select the option (action) from Event drop down, which when happens in the selected object the workflow gets initiated or triggered. The options are

?         Record is created - Workflow gets triggered when a record is created in the selected object, that is, Emp Master

?         Record is created or updated - Workflow gets triggered when a record is created or updated in the selected object, that is, Emp Master

?         Record is created or updated, with single trigger - Workflow gets triggered only once for a record either on its create or update in the selected object, that is, Emp Master

?         Record is created or updated, trigger when no action is pending - Workflow gets triggered for a record create or update, only when no action like Approve or Reject is pending for that record

?         Record is created or updated, with single trigger for each level ? Workflow gets triggered when a record is created in selected object, that is, RFA Header. Here, all pending Workitem pertaining to that record will be replaced with appropriate message saying 'Work item cancelled due to re-submission' except for user's immediate reporting to person, for whom existing Workitem will be overwritten.

?         Record is created, or updated by the owner of the record - Workflow gets triggered when a record is created, or updated by the owner of the record. Owner is the user who created that specific record.  

?         Record is created, or updated by the owner of the record, with single trigger for each level - Workflow gets triggered when a record is created, or updated by the owner of the record. Owner is the user who created that specific record. If any action is pending, those actions will be notified and closed.

Here, the option "Record is created or updated, with single trigger" is selected.

  1. If you wish to set the condition for the event, select the Field, Operator, and the Value from the respective drop-downs. You can set more than one condition by selecting "AND" and "OR" from the drop-down. Here, select the field as "Employee ID", Operator as "equals"; Value as "10" in the first row. If the conditions are satisfied, then the trigger will apply based on the option selected from the Event drop-down.
  2. In the Rules List section, click Add New Rule to add new workflow rule. The "Rule Details" page displays.

  1. Type the Rule Name in the text box provided. For example, type the rule name as "SalesRep_To_SalesManager".
  2. Select the User who is submitting for approval from the Source Title drop-down. For example, select the source title as "Sales Rep". In other terms, user in Source title of very first rule will trigger the workflow; here "Sales Rep" will trigger the workflow.
  3. In the target section, select the option (title, user, user from field) for approving the submitted data.

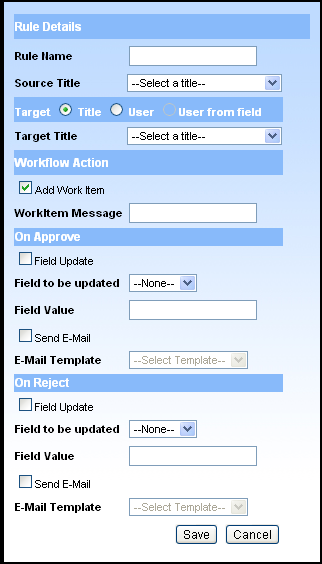
?         For Title based Workflow, select the target option as "title", you can select the title from the Target Title drop-down.

?         For User based Workflow, select the target option as "user", you can select the user from the Target User drop-down.

?         When target user should be fetched from particular fields then select the option as "user from field", you can select the field from the Target Title drop-down.

 Here, select Title option and Target title as "Sales Manager".

  1. In the Workflow Action, select the Add Work Item check box to add item in the Work Item page. By default, this field is selected.
  2. Type the message in the Work item Message text box, which has to display in the Work Item page. For example, type the message as "Emp_id" which picks the Emp_id from the submitted data and displays under Work item message.
  3. In the On Approve section, select the Field Update check box and select the field from the Field to be updated drop-down. For example, select the field as "Employee ID".
  4. Type the value for the selected field in the Field Value text box. For example, type the field value as "Approved by SalesManager".
  5. In the On Reject section, select the Field Update check box and select the field from the Field to be updated drop-down. For example, select the field as "Employee ID".
  6. Type the value for the selected field in the Field Value text box. For example, type the field value as "Rejected by SalesManager".
  7. Click Save to save the added rule details. You will find the added rule details in the Rules List section.


Note:

  • To update a rule details, click Edit  icon, and then change the fields you want to update.
  • To delete a rule detail, click Delete  icon provided on the above page.
  • Click Save to save the added Workflow Ruleset.

Note:

  • To update a workflow details, click Edit  icon, and then change the fields you want to update.
  • To copy the workflow details from an existing data, click Copy  icon.
  • To delete a workflow detail, click Delete  icon provided on the list page.
  • To view the particular workflow detail, click on the required User ID link.
  • To sort the column alphabetically/ascending order, click on the required column header and click the column heading a second time, to reverse the sort order.


Approve Workflow

Workflow Item page maintains the list of work items that are created when the user submits the task. The higher authority in the Organisation Structure can approve or reject the task or work item. If the work item is rejected, the subordinate (Say "Sales Rep") can view the rejected work items in this page. However, the higher authorities cannot view their approved work items in this page. The higher authorities and their subordinates can view their history of work item in the Workflow Item History page.

To approve or reject the workflow item, do the following:

  1. Click Tasks ? Approve Workflow menu item. The "Workflow Item" page displays.
  2. Click the required link under the Workitem Message header to review the data submitted by the subordinates. For example, click the Workitem Message "10" to review the details.
  3. Select the check box of the desired row and click on Approve button to accept the data submitted by the subordinates and submit it to the next higher authority in the Organisation Structure or click the check box next to Workitems Message provided as a header in a page and click Approve All button to approve all workitems in a page.
  4. To refuse the data, click Reject, the following screen displays.
  5. Type the comments for the rejection in the Reject with Comments text area and click Ok. This rejected data will be sent to the subordinate's Workflow Item page.

To view the rejected workflow item, do the following:

  1. Click Tasks ? Approve Workflow menu item. The "Workflow Item" page displays.
  2. The subordinate can view the rejected data sent by the higher authority in the Workflow Item page. Click the required link under the Work item Message header to review the data submitted by the subordinates. For example, click the Work item Message "21" to review the details.
  3. Click Close to close the rejected work item.

Workflow History

All users can view their workflow details (Submitted, Completed, Approved and Rejected) in the Workflow History.

  • Submitted: If the subordinate submits the work item to the higher authorities, then the status "Submitted" will be displayed in the Workflow History.
  • Approved: If the higher authorities approves the work item of subordinates, then the status will be changed from "Submitted" to "Approved".
  • Rejected: If the higher authorities rejects the work item of subordinates, then the status will be changed from "Submitted" to "Rejected".
  • Completed: If financial controller approves all the work items of subordinates, then the status will be changed from "Approved" to "Completed".

To view the Workflow history, do the following:

  1. Click Tasks ? Approve Workflow menu item. The "Workflow Item" page displays. Workflow History. You will find the Workflow History  link at the top right of the Workflow Item page.  The "Workflow History" page displays. Here, the user can view their workflow details such as Ruleset, Rule, Object, Status, Comments, Created By, and Created On.

Click to go top

workflow_designer.txt · Last modified: 2020/07/16 22:55 (external edit)