User Tools

Site Tools


role_setup

Role Setup

Note: Available only in Regular Edition         


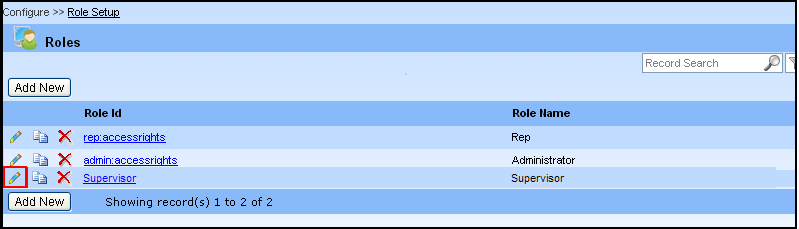
Role is the rights of an employee to access the menus and objects. Roles have to be created, before creating a user. This menu allows the administrator to set access rights for other user. In this page, administrator can set different roles like Senior Manager, Supervisor, Employee, and set User Interface permission to them. Role Setup page  lets you quickly create, and view the roles information. In addition, this page lets you edit, delete and copy the roles information. You can also sort and filter roles using standard and custom list views provided below the Title in a page.

You can click Configure ? Role Setup menu item to display the "Roles" page. This page will list all the Role ID, Role Name, Links to Edit, Delete, Copy option.

Creating a Role

The user has to enter the roles before entering the User details. You have to follow three steps to create a new role:

  1. Creating a new role
  2. Assigning the access rights to the menus
  3. Assigning the access rights to the objects

Creating a new Role

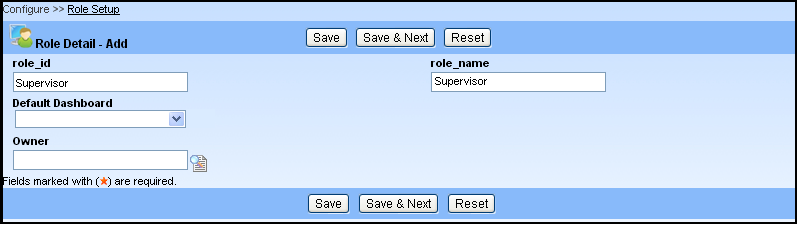
This page is used for creating a new role. You have to follow the steps given below to add new role" Supervisor".

  1. Click Configure ? Role Setup menu item. The "Roles" list page displays.

  1. Click on Add New button to create a new role. The "Role Detail - Add" detail page displays.

  1. Type an identifier for the role in the Role ID text box. For example, type the role id as "Supervisor".
  2. Type the name for the role in the Role Name text box. For example, type the name as "Supervisor".
  3. Select the name of the Dashboard to which Role users can see this Default Dashboard.
  4. Select the Owner of the record. Typically Owner will be any of the user id. E.g.sample_randy@cellarstone.com. By default, Owner will have access to this record.
  5. Click Save to save the role details or click Save & Next to save the current and create another role.
  • To update a Role details, click Edit  icon, and then change the fields you want to update.
  • To copy the Role details from an existing data, click Copy   icon.
  • To delete a Role detail, click Delete  icon provided on the list page.
  • To view the particular Role detail, click on the required Role ID link.
  • To sort the column alphabetically/ascending order, click on the required column header and click the column heading a second time, to reverse the sort order.

Assigning the access rights to the menus

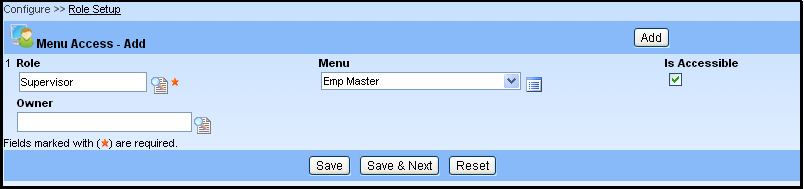
The user has to assign the access rights to the menu for the created role. You have to follow the steps given below to assign the access rights to the menus "Emp Master" for the role "Supervisor":

  1. Click Configure ? Role Setup menu item. The "Roles" list page displays. The below information is mentioned taking the Role ID "Supervisor" as an example.

  1. Click the Edit icon in the row where Role ID is "Supervisor" to assign access rights to the menus and make changes to an existing role details. The "Role Detail - Edit" detail page displays.

  1. In the "Role Detail ? Edit" page, you will find the "Role Access" child page. Click on Add New button to assign access rights to the menus. The "Menu Access- Add" detail page displays.

  1. By default, it will be the id, you have selected. Otherwise, select the appropriate id from the Role drop-down. For example, select the role id as "Supervisor".
  2. Select the menu from the Menu drop-down. For example, if you wish to set the menu "Program" for the Financial Controller, select the Menu as " Emp Master".
  3. Select the Is Accessible check box to make the selected menu accessible to the role.
  4. Click the Add button to add new menu on the same page, which is provided at the top right of the "Menu Access" page.
  5. Click Remove provided at the end of each Menu attributes section to remove the added details.
  6. Click Save to save the menu access details or click Save & Next to save the current and create another menu access.


Note:

  • Fields marked with asterisks (*) are mandatory.
  • To update a menu access details, click Edit   icon, and then change the fields you want to update.
  • To copy the menu access details from an existing data, click Copy   icon.
  • To delete a menu access detail, click Delete  icon provided on the list page.
  • To view the particular menu access detail, click on the required Menu ID link.
  • To sort the column alphabetically/ascending order, click on the required column header and click the column heading a second time, to reverse the sort order. 

Assigning the access rights to the objects

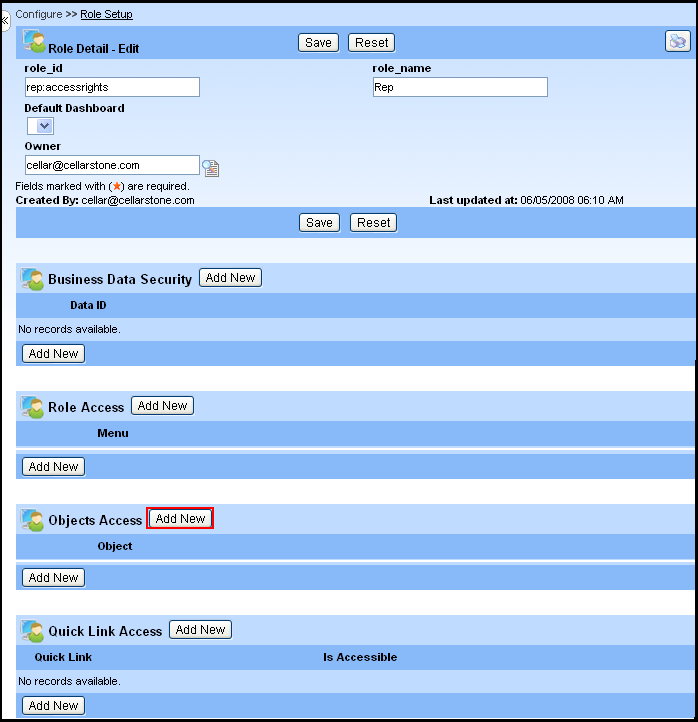
The user has to assign the access rights to the objects for the created role . You have to follow the steps given below to assign the access rights to the object "Emp Master" for the role "Supervisor":

  1. Click Configure ? Role Setup menu item. The "Roles" list page displays. The below information is mentioned taking the Role ID "Supervisor" as an example.

  1. Click on Edit icon in the row where Role ID is "Supervisor" to assign access rights to the objects and make changes to existing role details. The "Role Detail-Edit" detail page displays.

  1. In the "Role Detail - Edit" page, you will find the "Object Access" child page. Click on Add New button to assign access rights to the objects. The "Object Access-Add" detail page displays.

  1. By default, it will be the role id, which you have selected. Otherwise, select the appropriate id from the Role ID drop-down. For example, select the role id as "Supervisor".
  2. Select the object from the Object ID drop-down. For example, if you wish to set the menu "Program" for the Financial Controller, select the Object id as " Emp Master".
  3. Select the required check boxes to set the access rights (Read, Add, Edit, and Delete) for the menus. If you select the

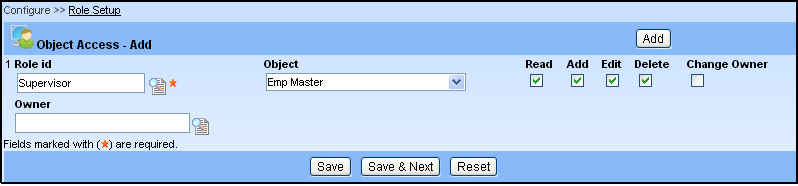
?         Read check box, the selected role will be able to view the information.

?         Add check box, the selected role will be able to create the new information.

?         Edit check box, the selected role will be able to modify the existing information.

?         Delete check box, the selected role will be able to remove the information.

  1. Click the Add button to add new role on the same page, which is provided at the top right of the "Object Access" page.
  2. Click Remove provided at the end of each Object attributes section to remove the added details.
  3. Click Save to save the added object access details or click Save & Next to save the current and create another object access.
  • Fields marked with asterisk (*) are mandatory.
  • To update an object access details, click Edit   icon, and then change the fields you want to update.
  • To copy the object access details from an existing data, click Copy   icon.
  • To delete an object access detail, click Delete  icon provided on the list page.
  • To view the particular object access detail, click on the required Object ID link.
  • To sort the column alphabetically/ascending order, click on the required column header and click the column heading a second time, to reverse the sort order.

Click to go top

role_setup.txt · Last modified: 2020/07/16 22:55 (external edit)